 |
Microsoft Outlook Express/Outlook |
|||||||||||||||
| ||||||||||||||||
| Web Site Hosting | Web Design | Broadband/Access | E-Mail Solutions | Accept Credit Cards | Hosting Support | |||
This page describes how to configure Outlook Express and Outlook 2000 or later to access your POP e-mail box. For general information about POP email, please see POP E-mail Accounts.
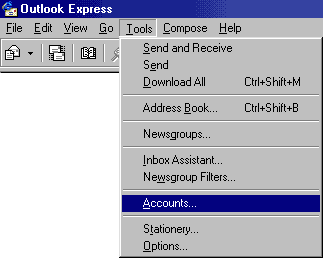
- Select Accounts... from the Tools pull-down menu.
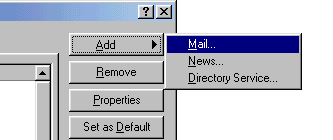
- You will see a listing of all the different accounts that you have Outlook Express configured to use. Click on Add... and select Mail... to add a new email account.
- From here out you will be guided by the Account Wizard. We won't cover each of the steps in
our instructions, but the important information is below:
E-mail address: username@yourdomain.com Type of mail server: POP3 Incoming Mail: yourdomain.com Outgoing Mail: smtp.yourdomain.com, or you can use the SMTP server provided by your ISP. POP account name: POP3 Login Password: your password
- Once you are done with the wizard, if you used smtp.yourdomain.com as the outgoing mail server you will need to configure the program so it knows the mail server requires SMTP authentication. Some ISPs require you to use their outgoing SMTP server and block connections to other SMTP servers. If you find you are unable to connect to smtp.yourdomain.com, advanced users may try changing their SMTP port to either 587 or 5190 on the Advanced tab, as alternates to the standard port 25.
Outlook Express: click Tools/Accounts, select your e-mail account, and click Properties. On the Servers tab, check the box for My server requires authentication. Click the Settings button and ensure Use same settings as my incoming mail server is checked (this is the default).
Outlook 2000-2003: click Tools/E-Mail Accounts. Click View or change existing e-mail accounts. Select your account and click Change. Click More Settings. On the Outgoing Server tab, check the box for My outgoing server (SMTP) requires authentication. Ensure Use the same settings as my incoming mail server is selected (this is the default).
- Under Tools/Accounts (Tools/E-Mail Accounts for Outlook), select the new account you just created and click the "Set as Default" button to make it the new default account.
Please note: the information on this page applies to ITS web hosting plans. It may or may not apply to other environments. If you are looking for a feature described here, or better support from your hosting provider, please consider hosting your site with ITS!
Copyright © 1996-2026, Integrated Technical Solutions, Inc., all rights reserved. See Terms/Legal for trademarks, copyright, and terms of use.
1555 N Naperville/Wheaton Road, Suite 107
Naperville, IL 60563
Naperville, IL 60563
phone 630.420.2550
fax 630.420.2771
fax 630.420.2771