 |
SQL Server Connection Information |
|||||||||||||||
| ||||||||||||||||
| Web Site Hosting | Web Design | Broadband/Access | E-Mail Solutions | Accept Credit Cards | Hosting Support | |||
Getting SQL 8.0 Connected
This document provides connection instructions for SQL 8.0 users (SQL 2000). These instructions were written for accounts hosted on the Windows platform.
You will need:
- Your Server Name and Web Site IP address to set up your connection. If you are not sure of your Server Name and IP address, go to the Account Information section of your hosting account Control Panel (www.yourdomainname/stats). There, you will find the name of the SQL Server: server.mssqlservers.com.
- SQL Server 2000 Server Enterprise Manager installed. If this is not installed, you will need to run SQL Server 2000 setup from your SQL software and select the Client Connectivity and Management Tools options. You must have your own copy of the software; ITS does not provide it.
Tip: For your convenience, we have provided a table at the end of this document that highlights what you will need to use with regard to your SQL server location, your username, your password, and your database name.
Note: SQL Server Enterprise Manager is a 32-bit application. It cannot be installed on computers running 16-bit operating systems.
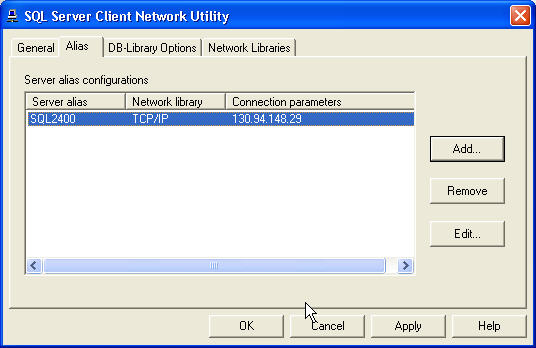
SQL Server Client Network Utility
The SQL Server Client Network Utility is used for managing the client configuration for DB-Library, Net-Libraries, and custom-defined network connections.
Connecting to Your SQL Server Database
- In the SQL Server Client Network Utility, click the following sequence:
Start > Programs > MS SQL Servers > Client Network Utility > Alias tab
-
Click Add.
-
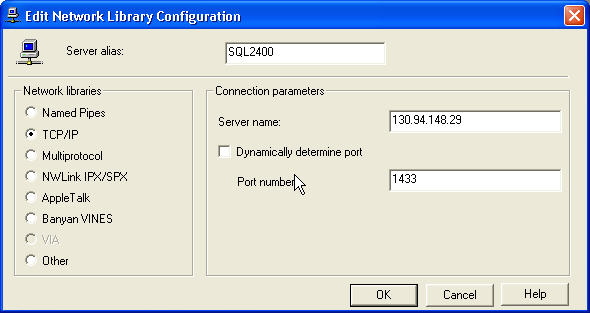
In the Edit Network Library Configuration dialog box, type a Server alias. The alias can be any descriptive name.
-
In the Network libraries group, select TCP/IP.
-
In the Connection Parameters group, enter your SQL server's Server name. The Server name can consist of either the SQL Server domain or the server's IP address.
-
Note: Your SQL Server name is provided in your activation notice (the notice that was sent to you by way of e-mail when you opened your account) and it is also located in your Control Panel under the heading of SQL Server. For example:
server.mssqlservers.com
-
In the Port number dialog box, enter 1433. This is the standard port number for Microsoft SQL server.
-
Click OK.
SQL Server Enterprise Manager
SQL Server Enterprise Manager allows for easy enterprise-wide configuration and management of SQL Server and SQL Server objects. You can also use SQL Server Enterprise Manager to:
- Create SQL scripts
- Manage tables, views, stored procedures, triggers, indexes, rules, defaults, and user-defined
data types
- Import and export data
- Transform data
By default, SQL Server Enterprise Manager is installed by SQL Server Setup as part of the server software on computers running Microsoft Windows® and as part of the client software on computers running Windows and Microsoft Windows® XP.
Using SQL Server Enterprise Manager to Register Your SQL Server
To register to your SQL server through Microsoft's SQL Server Enterprise Manager, follow these steps:
-
Right-click the SQL Server Group. A menu will appear.
-
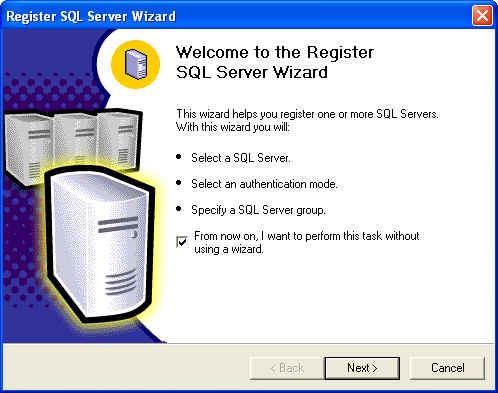
In the menu, click New SQL server registration. You may be presented with a Register SQL Server Wizard. If so, Check the box that says From now on, I want to perform this task without using a wizard and click Next.
-
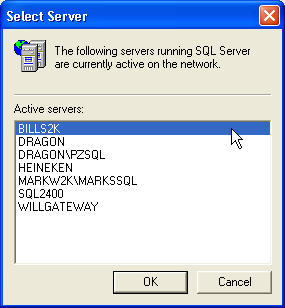
Click Browse. You will be presented with the Select Server dialog box.
-
In Select Server, select the server that you entered in SQL Server Client Network Utility section mentioned above (for example, "SQL2400").
-
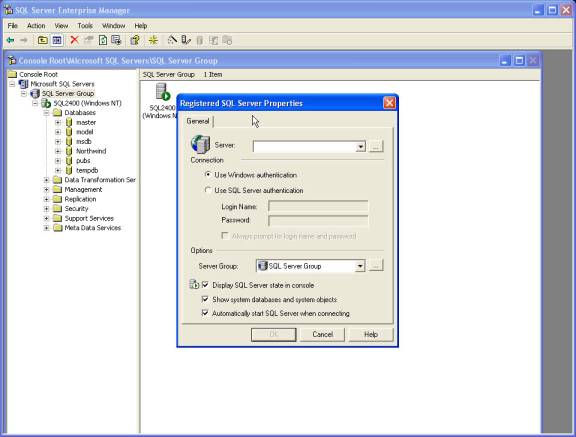
Click OK. The Registered SQL Server Properties dialog box will be displayed.
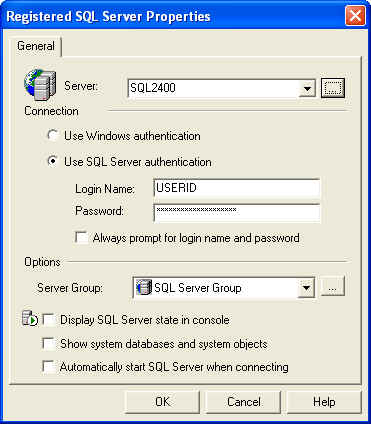
- In the Registered SQL Server Properties dialog box, make sure that:
- the server mentioned in the Server dialog box is the server alias that you specified
in the SQL Server Client Network Utility section.
- SQL Authentication must be selected
- your account UserID must be in the Login Name field
- your account password must be in the Password field.
Realize that:
- the Server Group option is a user preference. You would use the Server Group option
if you have multiple servers configured in your client and if you would like to keep them
organized by groups.
- the "SQL Server Group" is the default group created when you install Enterprise
Manager.
- The bottom three checkboxes are user preferences. As such, they are optional. The third
checkbox, Automatically Start SQL When Connecting, is irrelevant as only system administrators
and not end users have the permissions to start the server. The recommended setup is to
have all three items in the Options section unchecked.
- the server mentioned in the Server dialog box is the server alias that you specified
in the SQL Server Client Network Utility section.
- Click OK.
Values for the SQL Server Client Utility
The following table shows the values that you need to use when configuring the server as per the instructions in the above-mentioned SQL Server Client Network Utility section. Note that server represents the physical server number you are on. For Example:
sql100.mssqlservers.com (i.e. w3w010xx, w2k1xx)
| SQL Server Location | server.mssqlservers.com Replace server with the name of the server hosting your site. This information is listed under Server # or in your Edit Account Information screen. Single SQL server name can be found in your account's Control Panel |
| Username | Your web username |
| Password | Your web password |
| Database Name | Your username |
Please note: the information on this page applies to ITS web hosting plans. It may or may not apply to other environments. If you are looking for a feature described here, or better support from your hosting provider, please consider hosting your site with ITS!
Copyright © 1996-2024, Integrated Technical Solutions, Inc., all rights reserved. See Terms/Legal for trademarks, copyright, and terms of use.
Naperville, IL 60563
fax 630.420.2771